As with the Dig Dug and Venture post, most of this was originally published as part of the bavacade repair log from February 9, 2023. But in service of celebrating the greatest video game of all time, a dedicated permalink to share the Pac-man overhaul love was not too much to ask.
![]()
After fitting Pac-man with the BitKit2, I decided that cabinet needed to be on wheels and the bottom looked over closely given the floor was feeling tenuous under any kind of pressure. There were early signs of wood rot that may have been a result of water damage, although it was definitely not extensive.
![]() Pac-man‘s old floor was feeling its age
Pac-man‘s old floor was feeling its age
I stripped the cabinet down to its bones and sent it out to Alberto, who worked his magic. He replaced the floor entirely, while leaving everything else in tact, and added a base pedestal to hide the new wheels. Once I got it back I taped around the original artwork and painted the cabinet with the Scramble yellow I had left-over from that project, and did some touch-up on the black paint, but otherwise left the original artwork untouched. The yellow from Scramble was matte, which meant the color was a bit muted compared to the original Pac-man yellow.
![]()
![]()
This was probably the fastest I ever completed a strip down, re-build, and re-paint. It was all done in less than a week, including Alberto’s work—which was crazy fast. I took a ton of photos, and you can find them in this Flickr album. I was also racing against time given I had planned travel back to the US, so it was nice to get it done.
![]()
That said, once I returned from the US the matte yellow from Scramble I used for touch-ups was bothering me. So, I got that yellow mixed as glossy, and then re-painted the sides, front, and back of the cabinet with the new glossy paint, and now the difference between the yellow around the original artwork and the yellow I added to clean things up is much harder to notice.
![]()
It’s looking good! I still need to paint the back of this cabinet, which was also yellow. I’ll take care of that once I return. This dot gobbler is the crown of my collection, so it needs to be beautiful! In fact, you can get a better sense of the before and after effect with the two side-by-side images below.
Pac-man after the work
Pac-man before the work
Yesterday I started playing around with a field-programmable gate array (FPGA) board I bought a couple of months back called BitKit2. What is FPGA? It’s a circuit board technology that has been around since the 80s that is pre-assembled and allows for the programming of the hardware to happen after the fact. This technology is fairly new to me, so follow the Wikipedia link for actual informative details.
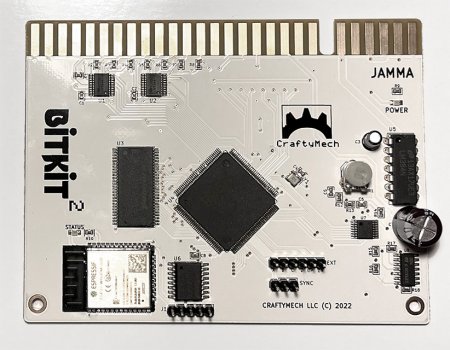
BitKit2, the latest version is white versus older red and green models
The BitKit2 is a FPGA board that has been programmed to play 50 classic video games such as Pac-man, Ms. Pac-man, Pengo, Scramble, Super Cobra, Dig Dug, Nibbler, Moon Cresta, Galaxian, Galaga, Crazy Kong, and many, many more. The board comes pre-programmed to play these games, but the ROM images (or game files) have to be sourced separately then uploaded to the board. The ROM community has been thriving for decades online thanks to emulator projects like MAME, so finding the ROMs you need to upload will not be hard. Two logical questions at this point might be: 1) why buy a BitKit2 when you already have a cabinet with the original game board?; 2) if you’re just downloading and playing ROMs from the web, isn’t it just emulation?
The answer to the first is a practical one: 40 year-old boards go bad all the time, and can be an expensive and/or time-consuming fix, so having a board that can stand-in for one of several games can be a relatively quick, cheap fix, not to mention the ability to turn any one cabinet into an instant multi-cade.
![]()
Original Pac-man game board, it is oh so beautiful
The second question is a bit more complicated. Folks who fix the original game boards also download ROMs from the web and load them on an original board’s ROM chips, so that is not necessarily the emulation piece. The difference between playing those ROMs on your computer versus a FPGA board is the ROMs are not using a dedicated, programmed board on your computer, the game hardware is virtualized. On an FPGA board the ROMs are loaded on a dedicated circuit board that is programmed hardware intended to run them as such. The FPGA boards are comparable in terms of speed and performance to the original boards (which is not the case with MAME emulators on your PC). So the real question becomes is it “as good” which can quickly become both overly technical and subjective all at once. I personally prefer the original board given I’m drawn to the illusion of a vanishing point that ends in an “original,” but I recognize the limits of that logic. When a 40 year old board is not working, I would rather have the game be up and running then refusing to change for fear of a micosecond delay in the FPGA board.*
![]()
Ok, enough of that, now let’s get to how to install the BitKit2, as well as look at how it works. The above image shows the BitKit2 (the bottom, white board) plugged into a Pac-man Jamma adapter (the top green board). Jamma adapters are purchased separately, and I picked up the one pictured from the Arcadeshop (there are others sold from Mike’s Arcade and beyond, so be sure to check which one you have). Jamma is a widely used wiring standard for arcade games that allows you to bridge the original game’s wiring with a multi-purpose board like the BitKit. You’ll notice on the Pac-man Jamma board there is an additional connector coming off of it with two +12V orange wires , four +5V red wires, and four ground black wires. This connects the Pac-man Jamma board to a switching power supply,
![]()
Why does this particular Jamma adapter need a switching power supply hook-up? This is because the Pac-man board converts the AC power coming in to DC power on the board, which is not common. Most boards do this well before that using a separate transformer and power supply board.
![]()
You can see the red connectors going into +5V, orange into +12V, and black to ground on the switching power supply in the image above. I was confused that there was no -5V connectors, but I confirmed that is the case and this setup for the Pac-man Jamma board from the Arcadeshop worked perfectly for me. So, in short:
After that the BitKit2 should power on and you’ll see two green lights, one to signal power is on, and the other to signal Bluetooth is working. At this point you can now interface with that board wirelessly using your computer.† There’s a dropdown to find and connect to your Bluetooth device, it’ll be something like BK-#### (such as BK-1077) and you should be able to connect to it—if not move closer and restart the BitKit board.
![]()
You can download and install the software for the BitKit Manager which will allow you to interface with the board to update the firmware, upload and manage game ROMs, and also upload high scores to a leader board.
![]()
The Manage Games interface is akin to FTPing files to a different machine, you select the game ROM zip files, click on the arrows sending them to the BitKit, and then below that there is a “Sync Game(s)” button that will then upload them to the board over Bluetooth.
![]()
You can also remove and/or erase all games. The manage Games tabs also provide ROM details for the games you are syncing:
![]()
And the Remixes tab provide links to special edition ROMs for Scramble, Ms. Pacman, and Eyes99, which is new to me:
![]()
There is also a section to submit high scores to the leader board:
![]()
This board contains quite a few features, and begins to marry the physical, offline tech of an arcade cabinet with the web in some fun ways. The idea of accessing the board wirelessly while inside the cabinet at will (no need to move and open the 200 pound machine) is pretty awesome.
With the BitKit2 installed and ROMs uploaded, you’ll need to access the board’s menu from the actual game cabinet. You can do this by depressing the player 1 button while powering on the game.
![]()
This main menu allows you to manage the BitKit2 settings, which includes system settings, game settings, video settings, and configuring controls.
System
![]()
In System you can enable the game orientation, credit cheat, attract mode, hide options, mode, etc. The credit cheat is pretty cool, with that on whenever you press the player 2 button twice quickly you add a credit. The attract setting initiates a slide show after two minutes of idleness that highlights games available and settings.
When the Hide Options setting is off you can press the player one and two buttons to reset the board, and thereafter quickly depress the player 1 button to enter the game menu to choose a different game.
Games
![]()
The games menu gives you access to all games settings for the ROMs you uploaded:
![]()
From this menu that lists all the game ROMs uploaded you can select a specific game and change settings like number of lives, bonus lives, turbo (if an option), etc. And these are granular, so they only work on a game-by-game basis, which is a nice feature.
![]()
I am using Turbo on Pac-man and made it the game the machine boots up (there can only be one), otherwise the settings are the default. And the 40 games I have loaded all contain their own settings which is pretty impressive.
Controls
![]()
The Controls menu allows you to test your buttons to ensure they work as intended. You can also define what your reset combination is, as well as what buttons you would use to pause a game—something I appreciate given I’m often interrupted during one of my epic games that will break all the recordz.
Video
![]()
There is also a Video setting that allows you to configure the monitor to test crosshatch patterns, colors, etc. An amazing feature I discovered was the ability adjust the vertical and horizontal positioning of your game so you should not have to touch anything on the actual monitor chassis, which was a huge relief for me.
Overall, it’s a really impressive interface with a ton of options. Also look like there are regular firmware updates—as recent as last month—which gives you bug fixes, new features, etc. I wonder if there is also the capability to program and load new games going forward? Not sure given my limited understanding of the FPGA boards, but that would definitely be a cool feature.
The CraftyMech site has a manual that will take you through all the different settings I not-so-briefly described above in greater detail, so be sure to check that out. I also recorded a 10 minute video wherein I work through how mine works (there are a few corrections that I have rectified in the notes of the video):
________________________________
*That said, some games are probably harder to port to an FPGA board than others, and then there are other physical limitations like vector versus raster graphics. So not all ports are equal, but it’s possible there will be no perceivable difference between Pac-man gameplay on the original board and that on a FPGA board.
†I personally would prefer if they had a non-wireless option way as well given the Bluetooth was finicky on my newer Macbook Pro running Monterey. I did get it working with a backup Macbook Pro running Catalina.